Sunday, January 31, 2016

The Second Inch

Getting the Garden Ready

I love all the information available on the internet to help me decipher when to plant or overcome any issue, major or minor, that I could ever possibly encounter. 

I checked this site, and the site gave me a great snap shot of my microclimate:

  Your results  

Each winter, on average, your risk of frost is from November 20 through March 13.
Almost certainly, however, you will receive frost from December 15 through February 17.
You are almost guaranteed that you will not get frost from April 7 through October 28.
Your frost-free growing season is around 252 days.


This is another Florida specific site for getting information about your local gardening conditions. 


I would like to plant out sometime in late March, so I thought I would get started with germinating and starting some seeds. 


On a field trip in Seattle to Oxbow Farms with my son, we were introduced to this nifty tool. 
You can find the tool here. 


This is my first year using it to start seeds with newspaper. 


Here's the steps I used to make the seed pots.


A strip of newspaper….


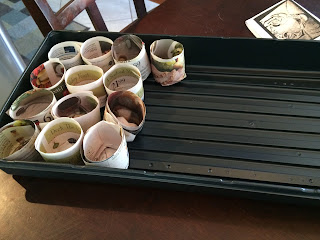
Fold in the edges and smash it into the the base. 


Ta da…


Next I filled them with compost and potting soil. I love this brand called "black cow." My local home improvement store didn't have "black cow," but they did have "black chicken." Black chicken was very stinky! 


All full!
I start my seeds in zip lock bags on a damp paper bowl. 
I did this and as they germinated I translated them to my seed pots. 


We are getting a good start. I am using a squirt bottle to water them, and I'm impressed with how well the newspaper is holding up. I thought they might be falling apart by now, but I think they are going to be perfect for translating…decomposing enough to keep the roots from forming a root ball instead of spreading out into the garden soil. I did add a little bit of the compost to the bottom of the seed pots, that I am hoping will provide fertilizer for the plants until they are planted out. I'm unsure if I will have too much nitrogen in the soil for some plants…. we will see. So far, I'm happy. 

I have had some cardboard boxes in the back of the truck, which has kept me from getting a scoop of garden soil for my bulk dealer. I'm hoping to empty my compost container into the bottom of my raised bed, even if it isn't completely finished and then add lots of garden soil to the top. 


Friday, January 15, 2016

The First Inch


Obsessed with gardening, we set out to create a backyard space for our family. We love to grow vegetables. I love to garden and am looking for a creative outlet to showcase our backyard transformation. I created this blog to catalog my progress and track the lessons learned for the next project or endeavor I take on in the backyard. My hope is to create a backyard masterpiece, one that our family will enjoy for many years to come and document our progress along the way. 


My daughter and I started off by surveying the new house and it's outdoor space. 


We talked about drawing up a plan for the backyard, but then we decided that it would be better to simply start with one corner and build it out from there…inch by inch.

I think our family enjoys "winging it" when it comes to projects., so, we decided to place the raised bed garden for our vegetables first.  Next we were off to the hardware store to buy the materials. 


We wanted a raised bed that was taller, so we decided to double stack the wood. We bought six (6) 2"x12"x8', and three (4) plain old 2"x4"s. My son was all about helping me at this moment. Power tools!!


We then cut all 2x4s in half. After many many moves, I discovered my circular saw was actually bent, and all the cuts were made at an angle. No worries, as this is a garden bed, and the cuts do not need to be precise. We also cut all the 2x12s in half. Well. Less than half. I let my seven-year-old son measure and draw a line. He did the first one perfectly, but then the next one was about 5 inches off. I didn't notice until I had cut it. So, I cut down the remaining board to match the smaller board. In the end we ended up with a box that is about eight feet long, and two feet tall. Then we layer them all out in the shape of the bed we were building. I wanted to have the 2x4s extend beyond the inside of the box, so that I could attach string to make climbing aids for climbing plants later. 


We lined the bottom with left over cardboard boxes. I have done this before, and the one lesson I remember is to ensure the boxes are free of any boxing tape. I made sure to a lip of the box outside of the garden bed, so that I can lay brick later in the season around the edges of the bed. 


We went shopping for the wood a couple of weeks before we were able to get outside and put it together, so the wood has a very nice "weathered look," lol. 


In the background you can see, I have the next project waiting to get started. Hopefully I'll be able to figure out how to use those old pallets to make a compost pile. 


Ta-da! Finished. This was the first stacked raised bed I've built, and I have to say the process was much easier than I expected. We really didn't have to be precise in any of the cuts. Nor was much precision required when screwing the boards together. 


Ready for garden soil and compost! I completed this box in January, so hopefully I can have it filled and ready for planting in March.