Sunday, April 24, 2016

More Beds! More Inches!

Today we started a few more seeds...


And added a few more raised beds to the garden. 


We put the hay in the bottom of the raised beds. Next weekend, we will pick up some more soil from our local gardening center. 

I also planted a couple of pots. One has strawberry and the other has a mixture of flower seeds and cilantro.


I added some more twine for a make shift tomato support structure.


The cucumbers are starting to climb the twine. 


The garden is growing, growing, growing.


All in all, I would say it was good day in the garden!


Friday, April 22, 2016

DIY Soil Testing

Since I used so much saw dust in the layering of the soil layers in my garden along with some of my own, cow, and chicken compost, I was curious whether my soil's pH could be off. I decided I would do some DIY soil testing.

After conducting some research, I settled on two different tests. The soil pH test and soil composition test. 

I used this graphic I located on Pinterest. 

Here are my two soil samples, mixed as 50% soil/50% water, and shaken. Then I added in one tablespoon  of vinegar to one sample and one tablespoon baking soda to the other sample. I continued adding a tablespoon at a time and checking for a reaction.


Then I added in one tablespoon  of vinegar to one sample and one tablespoon baking soda to the other sample. 

I continued adding a tablespoon at a time and checking for a reaction. I used a teaspoon to stir.


After adding about three tablespoons to each cup (with less less an a cup of sample liquid being tested), I had significant confidence that my soil was neither acidic or alkaline. 


Then to be certain I had actually added enough pH material to the mixture to actually affect the pH, I added a spoonful of liquid from one cup to the other and got instant bubbles.


Confident that my soil is balanced, I began then next DIY sample test for soil composition. 
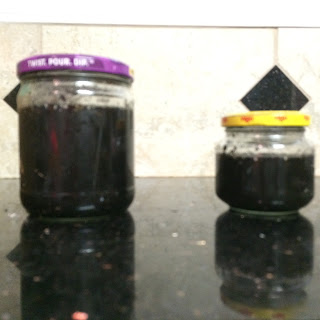
I used the website I found here. I took two soil samples from opposing ends of the raised bed and filled the jars 3/4 full, relative to the size of the jar. I used two different size jars because that is what I had on hand. 
Next I added water and detergent and shook well. 

Aftern one minute there was no change in the soil separation. 
I will take a reading tonight and tomorrow, although I believe I have basically created what is close to potting soil in my garden. 

These are the results after one day. I would say it compares pretty closely to the potting soil from the site I used as instructions. 
My Samples:


This is the soil samples from http://www.todayshomeowner.com/diy-soil-texture-test-for-your-yard/.

I think I pretty much have potting mix. 


As an update, I have added some scraps from my fridge to the top of the hay. I had some carrots, radishes, spinach, and romaine that had gone bad. We'll see if Ms. Ruth Stout's method works. You can see the pieces of carrot in the progress photo below:


Monday, April 18, 2016

A few more inches

It's been a week, and the plants have really taken off. 
My kitchen garden is growing so well, that I may go ahead and put in another raised bed right beside this one. 


I'm very excited to try out the gardening method described here. I came across this article some time ago and saved it in my interest page. I'm excited to add my compost contributions directly to the garden. We will see if this works. I'm always curious to find techniques that decrease the total amount of labor needed for a successful bounty. 

I already have baby strawberries and green peppers. 


I carefully inspected each plant to see if I had aphids or any other pests. I was surprised to see the bottoms of all leaves are clean. 
I did see evidence of a caterpillar (I think), with an egg plant leaf almost missing in its entirety. 
I noticed some weird spots in the inner leaves of the strawberry. I'm not sure what is causing them.


I looked over the plant pretty thoroughly, but didn't see evidence of any pests. 

Next, I got busy adding the straw to the top of the garden. In the article it states, "You need at least twice as much as you would think." The article calls for 8inches, but perhaps less if you use bailed hay. I was using baled hay. Good hay, that I bought; unfortunately, there isn't much in the way of livestock close to where I live. 
I barely made a dent in the hay. I plan to utilize the rest in building out the rest of the backyard. I find myself getting excited thinking about what kind of projects I can do to make use of the excess hay. I also ended up with some excess bags of play sand that we originally intended to fill the base of basketball hoop. (We went with water instead, hence the extra sand). I'm thinking I may build a fire pit :)

Here is the left over hay after spreading it in the garden. 


In the article it talks about wood shavings, which I used in my garden possibly making the soil acidic. I'm thinking I may need to get a soil sample. I'm hoping the 50% sand mixture that was completely devoid of all nutritional value will offset any acidity introduced into the soil. (Eeek)

I plan to test with this method…


Here is the garden with hay around each plant. I took care to protect the plants has I added the hay. 


Finally, I needed to add some string for the climbers. I used some left over twine that I had in the garage. (love free!)


I'm thinking about adding the twine across the garden bed in an "x" shape to support the tomatoes when they get big enough. I may break down and pick up some of the wire hoops instead… we'll see. 

So far, I've been watering it pretty regularly (hitting it with a hose every other day). 


Monday, March 7, 2016

Beginning to fill the raised bed...


 I have been busy with various projects around the house, and time has slipped away from me. My seedlings are way behind schedule. I need to get them started again. I'm not exactly sure what went wrong with them. Maybe it was the compost in the cups, or perhaps it was a little too chilly in the house. 

My compost piles have been coming right along. I was finally able to chainsaw down the tree that fell into our yard after a big storm. I have added it to my open compost pile. It doesn't look like much all chopped up, but it seemed like a big undertaking. This was my first time using a chainsaw. I was surprised at how much it kicked and jerked when it grabbed the dead tree. 


Largo sure liked the perched I fashioned for her from a branch of the downed tree.


I have also been collecting spend coffee beans from my local Starbucks for my bin compost. On several occasions, I have added large batches of spent coffee beans to my compost. As usual, I make almost every meal at the house, so I have added all the left over kitchen and veggie scraps to the compost bin. I've been shredding paper grocery bags to make sure my "browns and greens" are properly mixed. I am looking forward to emptying the bin and attempting the new compost method I talked about earlier.  

In the meantime, I've been meeting new people and learning new things about my new local area. So far, I've learned that we have primarily a sanding soil here which tends to be well drained. I met a man that makes furniture, and he politely offered me all the shavings from his workshop for my garden. This afternoon my new friend made good on his promise and delivered to me two large bags of sawdust from untreated lumper for my garden. 


I am trying to achieve multiple goals by using the soil from my yard to fill my garden box. First, I did the math on buying garden soil, and the total would run in the neighborhood of $400. I really want my gardening hobby to be a cheap hobby, so I wanted to utilize the free soil from my own yard to fill up the bottom layers of the box. I plan to dig in some compost and finish with a layer of good gardening soil on top.

Second, I've been meaning to alter the drainage pattern of my backyard, and redirect the water pattern away from the house. I have been wanting to move some soil around to help with the drainage issue where the water tends to pool on my patio. I have a feeling there will be a lot more work in leveling the yard, but at least this is a small dent. 

Because I received that delivery of sawdust and shavings, I decided to roll up my sleeves after work and get to work in the garden. In anticipation of the sawdust, I had been contemplating how to best utilize it for weeks. Since this soil and shavings are going to be pretty far down in my garden bed, I am thinking there is no need to compost them ahead of time. I've spent a good deal of time thinking about if I would add the shavings directly too my raised bed, or if I should compost it first. I'm unsure how this may affect the Ph of my soil. The place to which it is being added is much deeper than any of the roots will likely reach. At this point I'm unsure if I'll be simply fertilizing the deeper soil to no eventual benefit for the raised bed. In other words, are nutrients going to seep downwards and make no difference to the upper layers. Ultimately, I decided to stop over thinking everything.  

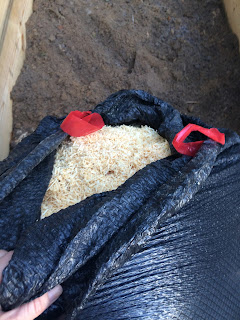
What I settled on was a "layered and wait" approach. I started by placing one thin layer of sand on the cardboard boxes, followed by the two bags of shavings. 


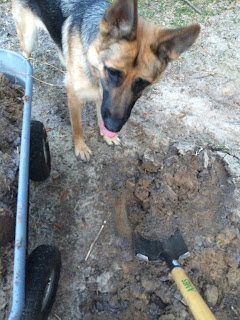
And I had a helper this time! I added two wagons full of dirt to the bottom layer.


Here are the shavings going in onto of the dirt layer….


The second layer is complete, and there was a lot of shavings to go around.


After the second layer was complete, I moved onto the last layer of soil. Perhaps the natural composting that will occur will be enough that the garden is better than it would have been with just sand.


And another helper!


After three more wagons of dirt, I think I'm done!


I have a party at the house this weekend, so hopefully on Sunday I'll have the time to start some seedlings for the garden. The weather here is beautiful. I wish I had some plants to harden off right now, but such is life. I will have a shorter growing season this year, for this area, but it will still be longer than most areas!


Tuesday, February 9, 2016

Back to the first inch...

My seedlings have died.

Yes, that's right. They didn't make it. I'm not sure what went wrong. Here is a list of possible suspects:

1. (I think the most likely culprit) The compost in the potting cups. I amended the potting soil with about 50% chicken compost. Thinking back on the previous seeds I've started, I usually do not add the compost until transferring the seedlings into bigger pots.

2. The amount of water wasn't correct. I used a spray bottle of water to water the seedlings. I've used this technique before, but I couldn't find a bottle in my local grocery store that had a dispersed spray. The bottle I purchased had a more direct stream, I believe for bulk window cleaner or something. I could not adjust the spray stream at all. At one point I resorted to spraying the water into one of my hands and allowing it to drip onto the seedlings.

3. The plants were over/under watered. I think that the plastic seedling trays offer a "continuous watering" feature, so if you over water, the water remains in the secondary pan. Whereas, with the new paper cups, the seedling cups would be sitting in the extra standing water. For this reason, I paid particular attention to the amount of water, and attempted to not over water them. Perhaps the seedlings didn't get enough water after all.

4. Some of the seedlings outgrew the tray lid, while others did not. Most seedlings had their new leaves only. The small seedlings are completely dead. The seedlings leaves died away, while the stalks are still green, leaving me curious whether or not they are completely dead.


Only the pole beans were still visible in two weeks. 

If you have any thoughts, tips, or help-- by all means-- please leave it in the comments below. 

An update on the compost- things are going well with the compost. One bin is completely full. I was able to pick up a couple of large bags of spent coffee beans from Starbucks for free. I've been adding browns greens and other things to the bin in order to make a good amount of compost. 

At some point I'm thinking of creating layers within my raised bed. I've read a lot about amending soil with compost that isn't completely finished, and I'm thinking of attempting this technique. I have incredibly sanding soil here, so I've heard from coworkers that fertilization around here is necessary twice as often as usual. 

I'm really unsure if this will work, but if it does or does not- I'll write it down here :)

I'm planning to start some more seeds next weekend, and I think I may breakdown and buy a seed tray. I really wanted to make the paper cups work, but I'm not sure how much time I am willing to invest to make them. 

Sunday, January 31, 2016

The Second Inch

Getting the Garden Ready

I love all the information available on the internet to help me decipher when to plant or overcome any issue, major or minor, that I could ever possibly encounter. 

I checked this site, and the site gave me a great snap shot of my microclimate:

  Your results  

Each winter, on average, your risk of frost is from November 20 through March 13.
Almost certainly, however, you will receive frost from December 15 through February 17.
You are almost guaranteed that you will not get frost from April 7 through October 28.
Your frost-free growing season is around 252 days.


This is another Florida specific site for getting information about your local gardening conditions. 


I would like to plant out sometime in late March, so I thought I would get started with germinating and starting some seeds. 


On a field trip in Seattle to Oxbow Farms with my son, we were introduced to this nifty tool. 
You can find the tool here. 


This is my first year using it to start seeds with newspaper. 


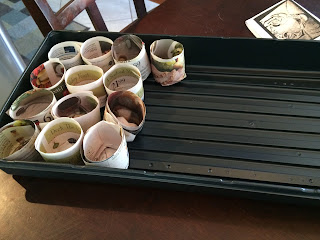
Here's the steps I used to make the seed pots.


A strip of newspaper….


Fold in the edges and smash it into the the base. 


Ta da…


Next I filled them with compost and potting soil. I love this brand called "black cow." My local home improvement store didn't have "black cow," but they did have "black chicken." Black chicken was very stinky! 


All full!
I start my seeds in zip lock bags on a damp paper bowl. 
I did this and as they germinated I translated them to my seed pots. 


We are getting a good start. I am using a squirt bottle to water them, and I'm impressed with how well the newspaper is holding up. I thought they might be falling apart by now, but I think they are going to be perfect for translating…decomposing enough to keep the roots from forming a root ball instead of spreading out into the garden soil. I did add a little bit of the compost to the bottom of the seed pots, that I am hoping will provide fertilizer for the plants until they are planted out. I'm unsure if I will have too much nitrogen in the soil for some plants…. we will see. So far, I'm happy. 

I have had some cardboard boxes in the back of the truck, which has kept me from getting a scoop of garden soil for my bulk dealer. I'm hoping to empty my compost container into the bottom of my raised bed, even if it isn't completely finished and then add lots of garden soil to the top.